Camera Object
The Cameras in Obscene Studio are really powerful! You can insert several cameras into your scene, with different effects, and add lighting, 3D objects and particle effects. It is a game changer for your Live Stream!
Camera Object
The Camera Object allows to display Video from any camera attached to your computer, or from a device that exposes itself as a Virtual camera, such as an HDMI Video IN USB Device, that you can use to connect your console
You can apply all kinds of effects to Camera Objects, just like to any other object. This includes:
- Irregular Clipping Masks
- Animations
- Filters
- MIDI Mappings to all the above
They offer some pretty powerful features:
You can display several views from the same Camera Object, with different filter parameters, masks or Midi Mappings.
Camera Objects may be visible or hidden by changing to another scene without them, or by mapping MIDI Buttons or Controls to parameters like "Display", "Opacity" or "Scale".
Camera Properties
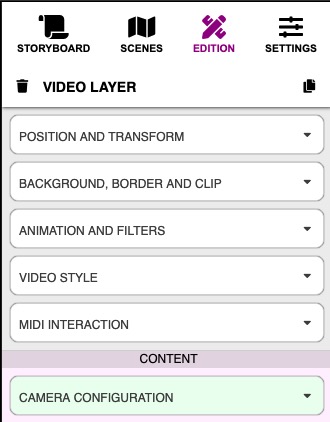
Clicking on a Camera Object will display its property cards on the Sidebar.
 Side Panel of a Camera Object
The Common Properties behave just like in the rest of the objects.
Let´s take a look at the specific properties of the Camera Objects
Video Style
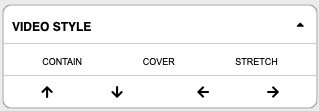
The Video Style Property Card allows to adjust the video scaling, size and position, if the object has a different size or aspect ratio.
 Video Style Property Card for a Camera or Video Object
Select a sizing strategy and an alignment in the controls above.
| Sizing Strategy | Meaning |
|---|---|
| Contain | Scales the Video as large as possible within its container without cropping or stretching the image. |
| Cover | Scales the Video (while preserving its ratio) to the smallest possible size to fill the container (that is: both its height and width completely cover the container), leaving no empty space. If the proportions of the background differ from the element, the image is cropped either vertically or horizontally. |
| Stretch | Distorts the image so it fits the available space |
The Alignment Arrows change which area is left out in the case of cropping.
Camera Configuration
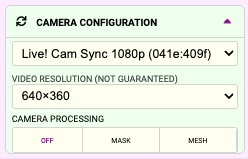
In the Lower part of the sidebar you can find the Camera Configuration Card, and other cards depending on the selected camera mode.

- Select the Camera to be used in the first Combo-Box
- Select the desired resolution in the second one.
- Select, if desired, a Camera Processing Effect. These effects are really powerful, but also require a lot of computational power.
Remarks
- The camera may not support the resolutions displayed
- Resolution request is only honored on the first camera instance, if you are using multiple views of the same camera. Next views will get the same resolution until the camera is stopped and idle.
Camera Processing
Obscene Studio features 2 special camera modes that use AI to render an alternate reality.
Holo-Camera
The Holo Mode masks out the background in realtime, allowing you to blend your silhouette into the rest of the scene.
 The HOLO Camera in action: Blend your hologram into the scene
- Select "HOLO" to enable the Holo-Camera Mode.
Holo-camera Features and tricks
Filters from the Common Object Properties are additive over the Hologram effect
You can place a Holo-Camera in the Watermark Scene, so it will be displayed in all scenes.
Combine this with MIDI-Mappings to the Scale and Position for an interactive immersive experience.
You can duplicate Holo-Cameras and apply different effects. The computations are only done once per video stream source.
Mesh-Camera Mode
The 3D-Camera creates a realtime 3d model of your face, and allows you to add textures to it, and also to attach other 3D abjects like rings, hats …

- Just select "MESH" to enable the 3D-Camera.
- Please refer to the 3D Camera article for further details.
Advanced Camera Effects: UI
While Holo-Cameras or Mesh-Cameras are active in the scene, you will see Spinning Cog(s) in the top Status Icons.
| Icon | Meaning |
|---|---|
| A Camera Processing module is running |
Additionally, you can see a color-coded CPU Load Warning. These do not refer to the Camera effects exclusively but to the overall system load.
| CPU Load Warning | |
|---|---|
| YELLOW | CPU load is medium to high |
| ORANGE | The CPU load is High. The streaming quality can be affected. |
| RED | The CPU load is CRITICALLY HIGH. The streaming quality will for sure be affected. |
Related Links
- Next Object: The QR Code
- All Objects

